Monday 30 May 2011

Make-up Bag


Can I talk about something a little taboo? Don't worry it's not s.e.x. it's money. :) (phew!) I know a lot of people have been affected by the economy and finances. We have. We are struggling to save for a deposit for our own home and will be saving as much as we can for a good few more years. Even though my husband got a new job the beginning of this year with a larger pay, because of the economy and government cutbacks we actually will be worse off this year financially. :( 

Found this out just a few weeks ago. So we are doing a few things differently. Having a 'stay-cation' instead of going away on holiday. And I decided I need to be more organised with presents this year and try to make more myself. I love to make presents for people, but I'm very unorganised and end up with a mad dash to the shops instead. 

So in the spirit of having gifts ready I guessed my way through this make up bag.


I cut two rectangles of fabric 10" by 12" and two the same size of oilcloth. I pinned one of each right sides together with an 8" zip inside centered. Sewed down and turned the right way round.


Do the same with the other side of the zip.


Sew along the bottom and along one side, unzip the zip to turn later and sew down the other side.


Cut out two inch squares from each corner and pinch the inside corners apart to make a straight line and sew. (look at the photo below because I really struggled to make that last part make sense!)


Do for all the other corners.


And turn.


Now I know the seams are visible but oilcloth doesn't fray and it doesn't bother me as I know the recipient will be soon covering it with plenty of lippy and mascara.


The fabric is from Ikea (is there anything they don't do?!)


I'd love some ideas of other things I could make as presents. I have a large family with lots of ages, but I especially struggle with the men in my family!

One Day Monday

Check out this gorgeous mirror for Tidbits from the Treymaynes.


She made it from scratch with wood and dollar store mirrors. I saw it a while ago and my fireplace needs this!


And what about these cupcakes from The cupcake blog?


Cath Kidston Wedding Cupcakes


My brother has asked me to make cupcakes for his wedding in a couple of months and the colours are similar to these. (I may need MANY practice runs...)


What are you working on? Any ideas on beautiful cupcakes that are easy to mass produce?

Friday 27 May 2011

Robyn Rabbit

I saw this amazing tutorial a few months back and finally got around to doing it this week. 


There's no point in me showing how I did it because hers is better. The only change I made was to fold the material in four for each of the ears, legs and ears. ('cos I'm really lazy!)


So you end up with...


And eventually...


It was supposed to be a (now don't hate me) Christmas present for my niece. (and yes I do have to be that organised. We have a big family!) But Izzy loved her so much I thought I'd just have to make another one!


I'm sure you wouldn't make this mistake, but remember to make all the limbs about half again bigger than you actually want them. Mine are a little more spindally than I had intended and got over stuffed. But Izzy adores her!

FAIL

So...


I re-covered an old lamp shade...


I draped. Glued.


Trimmed.


Tried to cover it up with ribbon.


And see the above pic for evidence of a pretty serious burn. 

Yet I still ended up with this.


Yes that is brown ribbon with a black base.


Yes it does make the before picture look like an after.

So please help! Should I just scrap it? I even tried making a load of ruffles, but that really didn't work with the shape of the shade! Is there anything I can do to save it? 


However on the plus I do have a jar filling with beautiful flowers for a big project I'll be doing with the girls from my church.


Ahh that's better. Tutorials for the melted flowers here and rolled flowers here.

Monday 23 May 2011

Brand New! One Day Monday...

Welcome to 'One Day Monday'!


Every Monday I'm going to share a project that I've seen and would love to do, one day.


Without further adooo...


[2011-05-21 007[4].jpg]

Cute baby shoes with interchangeable flowers from Jill at Made it on Monday

007

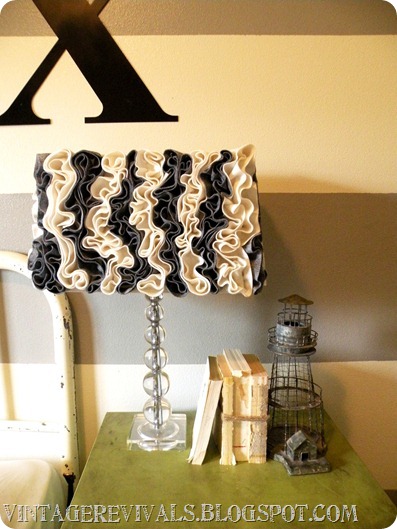
Amazing ruffled lamp by Vintage Revivals. I tried to disguise the horrendous job I did of recovering, but it would seem that even ruffles cannot improve that baby! I'll post some pictures soon and give you a good laugh.

Flat Wall Bookholders

I love these bookshelves feature on Ana White. Wonder if my landlord would mind a few more holes in the wall...


And I'd love to make this if my husband would let me have a go at our laptop. From A girl and a glue gun. (She is the reason I begged pleaded demanded asked my husband to get me a glue gun.)

If only I could craft full time...

Sunday 22 May 2011

More flowers?! In my defence it is Spring...

Being the cheap skate that I am, when I saw some really sweet embellished tops for Izzy I thought "Hey, I could knock that out for her!". So off I went to the plain tops and bought up a few.


(Yes those are my tiny feet, and I do need to do my nails, don't judge it was Saturday morning. If you look really closely you can see my pjs too!)


Made the melted circles for the flowers and played around with the placement.


Added the buttons (or you could use beads).


Then sewed them in place going through the button holes.


(I had planned on the lower one being closer to the other two, but I had a birthday party to get her to!)


One happy girly!


Oh yeah that's why. Blatant bribery.


A little sneak peak at my next project...


Can you guess what it is yet?


Sharing this at skip to my lou and probably some of the others on my blogs I love page.

Wednesday 18 May 2011

My new favourite project

I feel I'm still quite new to blogging (only started mid January this year), and I realise that somewhere along the line I may get a negative comment or two. I accept that and carry on because I'm hooked and I love it, plus my style is not going to be everyone else's (which keeps the world interesting right?). However, I would like to ask a favour from you all (my gorgeous readers (it's okay to blatantly butter you up. And to use brackets inside brackets. Cos it's my blog.)) :) 


The brackets have reminded me of something so forgive me while I share this hilarious lovely story about my mum, who actually has had a phone a while and texts weekly or so. My little sister got some GCSE results at school the other day and text my mum 


"Mum I did really well on my exam!!! I got A :D"


(reply) "Okay. Well done."


Hmm not much enthusiasm so when she got home she asked my mum why she hadn't been happier. Yes she thought my sister had gotten a 'D'. It's ok, I'll wait while you go and re-read the text. 


I mean, how many of the teenagers today use colons anyway? Never mind in texts! 


Anyway back to the favour...I know not everyones taste is the same as mine, but pleasepleaseplease save any not-so-nice comments for another idea (maybe the lamp shade re-cover that ended pretty badly, and with an injury, I'll post it soon for you to laugh at), because I really love this one. 


Thank you!


So I started with a beaten up toy box that I originally wanted to do black. So...


But then I decided that it wasn't going to go with the fabric I'd chosen or look right in my living room so I sprayed over in white. But I'm glad I did because it ended up being a great colour and looks kind o shabby chic (not that I would be able to create that look if I had tried!)


I used gloss white and it looks pretty tough and I didn't have to varnish it! 


The best part about this box (yet another of my grandma's awesome finds!) is that it comes with a padded lid that doubles as a seat!


Now I don't normally have an eye for restoration, but when I saw this, even with the train and crazy looking train driver painted on the side, and with the stained (and potentially soiled) nylon blue lid, I was sold. I knew how I wanted it to look (well except I was wrong with the colour, see what I mean about not having an eye for it!).


And it turned out even better!


The bag is full of hair bands and clips, first cos Izzy likes to dress us up, and second because it gets crazy on a morning, and having most things downstairs and close to the getting ready means a (slightly) less crazy mum!


For the box lid I wrapped the material round like I was wrapping a present, but ironed a hem on the sides that would be exposed and hot glued down. A lot.


Then looped over the end of the ribbon and hot glued some more. (It works better to do small sections as it dries pretty fast.)


There you have it. My favourite (and longest) post! 


And to finish...


The boy that found the one tiny car in the whole crammed full box!

Rolled flowers


I have seen this type of flower on a few blogs and thought I'd try it myself. The best thin about them is that you can use just a long off cut of fabric. Mine came from a lamp I was re-covering and I just used the scrap material I'd trimmed and managed to make these three flowers! I love being cheap efficient :)


Start with a long one/two inch strip of fabric and tie a knot in one end.


(You can see the old lamp covering in the background!)


Then twist the long end close to the knot and wrap it around the knot.


Secure with a little hot glue and continue with tiny blobs of glue every cm or two making sure that the glue is a little lower than the top of the flower so that it won't show up. (Though I had glue showing in a few places but it didn't show very much on the white fabric.)


When the flower is the size you want it trim the fabric and glue down on the reverse which will also give it a bit more stability.

I used a small one for one of Izzy's rings that the gem had fallen off.


These are ones I tried with some free fabric (my first attempts).


(canvas and fabric letter details)

And glued two larger ones on a frame I got reduced and sprayed.


I love the unfinished edges that are fraying too. Now I just need to attempt a family photo to fill it. The thought fills me with dread!